Redux 架构概览和原理剖析
/ / 点击 / 阅读耗时 40 分钟
本文非完整的开发指南,具体开发细节请参考官网文档。里面涉及的一些基础概念,翻译自官方文档。
本文主要阐述了 Redux 设计的核心概念,梳理了涉及到的知识结构,方便你能快速地对 Redux 有一个完整的认知。
在此基础上,探索了 Redux 框架的一些基本原理和部分源码的解读。
最后做了一些扩展和延伸。
需要着重申明的是,Redux 本身很简单,简单并不总是意味着容易。Redux 也很强大,作为一种非常简洁优雅的状态管理方案,可以支撑起各种复杂的应用逻辑。随着 Kotlin MultiPlatfrom 的发展,Redux 架构方案也会有更多的应用场景 (纯粹个人预测)。
0. 介绍
一言以蔽之: Redux 是一种可预测的状态管理容器 ^1。
安装
Redux 经常和 React 框架一起配合使用,当然 Vue 也是如此。虽然 Redux 本身非常小(只有 2kb),但是却又非常强大的社区生态。
下面简单说一下 Redux 的安装使用(可以直接跳到 总览和概念 这一部分, 并不影响阅读,你可以把下面的部分当做链接导航来使用)。
Redux Toolkit
1 | NPM |
Redux Core
1 | NPM |
其他补充
假设你在使用 React 框架,那么你很有可能需要下面的依赖:1
2npm install react-redux
npm install --save-dev redux-devtools
创建 React Redux App
npx create-react-app my-app --template redux
更多细节参见官方文档1
核心概念
更多细节参见官方文档2
学习资料
更多细节参见官方文档3
社区生态
更多细节参见官方文档4
例子
更多细节参见官方文档5
1. 总览和概念
什么是 Redux
Redux is a pattern and library for managing and updating application state, using events called “actions”. It serves as a centralized store for state that needs to be used across your entire application, with rules ensuring that the state can only be updated in a predictable fashion.
翻译:Redux 是一种编程模式,主要用来管理应用状态,通过 Action 来更新状态。它包含了贯穿整个应用生命周期的状态,称之为 Store, 还有一些规则来保障状态可以被“可预测的”更新。
为什么用 Redux
官网的章节^2是这么描述的:Redux 帮助你管理整个应用共享的“全局状态“。
Redux 让我们更好的理解状态何时何地以及为什么以及怎样被更新的,并且让我们的应用逻辑可预测。Redux 让我们映红可预测,更方便做测试,怎强了应用的鲁棒性。
什么时候用 Redux
Redux 和其他工具一样,需要我们做出一些折中。需要我们了解更多的概念,代码量也会增加,代码的编程模式也有更多的限制。在如下场景,从长期来看,短期的妥协还是值得:
- 应用内各模块经常需要状态共享
- 应用状态更新频繁
- 更新状态的逻辑复杂
- 应用属于中等或者重量级规模,而且有多人协作
Redux 并不是银弹,你需要仔细思考Redux 是否解决你目前遇到的问题,再决定是否使用它。
术语和概念
在真正开始之前,我们先解释一下 Redux 相关的概念和术语。
状态管理(State Management)
以计数器(点击按钮,计数器增加 1)为例:1
2
3
4
5
6
7
8
9
10
11
12
13
14
15
16function Counter() {
// State: a counter value
const [counter, setCounter] = useState(0)
// Action: code that causes an update to the state when something happens
const increment = () => {
setCounter(prevCounter => prevCounter + 1)
}
// View: the UI definition
return (
<div>
Value: {counter} <button onClick={increment}>Increment</button>
</div>
)
}
例子包含三部分:
- State,应用的数据源
- View,基于 State 的数据驱动 UI 组件
- Actions,用户触发的事件,更新 State
这是一个简单的 ”单项数据流“ 的应用:
- State 描述了某一个应用的状态
- UI 的渲染基于 State
- 对于用户的点击等输入,Sate 会根据具体场景更新当前值
- UI 的重绘基于新的 State
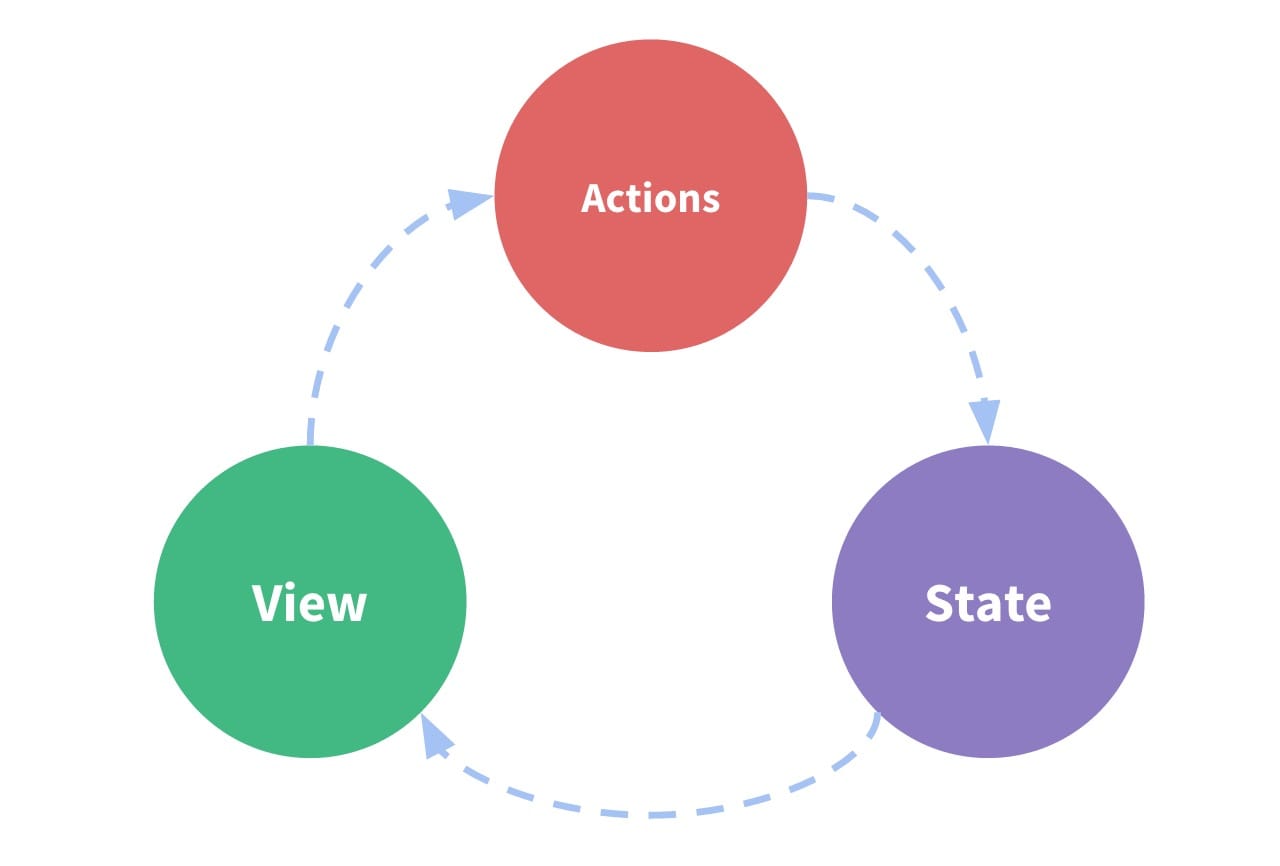
计数器的例子比较简单,但是当多个组件消费同一个 State 会让应用越来越复杂,尤其是当组件分布在应用的不同部分。当然,可以通过把 State 提升到功共同父组件来解决,但是实际场景可能不总是这样。
另一个解法,可以通过把状态从组件树中抽离到全局,这样,我们的组件树可以看做 View ,包含的各个组件就可以共享 State 了。
通过重新定义 View 和 State 的概念,并且把两者区分来看,可以增强代码结构的可读性和可维护性。
这就是 Redux 背后的基础概念: 中心化存储应用共享的全局状态,以及更新状态的规则,以此让应用行为变得可预测。
不可变(Immutability)
字面意思。
Javascript 对象和数组默认都是可变的。1
2
3
4
5
6
7
8const obj = { a: 1, b: 2 }
// still the same object outside, but the contents have changed
obj.b = 3
const arr = ['a', 'b']
// In the same way, we can change the contents of this array
arr.push('c')
arr[1] = 'd'
例子中,我们更改了内存中相同引用的对象或者数组。
通过拷贝对象和数组,我们来实现 “不可变”。
1 | const obj = { |
Redux 中约定,状态更新都是“不可变” 更新。
一些术语
Actions
Action 就是一个有 type 字段的普通 JavaScript 对象,它描述了事件的一些元信息。
type 字符串描述了 Action 的名字,例如 todos/todoAdded。
Action 对象可以包含其他字段来来做数据负载,根据约定我们一般叫做 payload:1
2
3
4const addTodoAction = {
type: 'todos/todoAdded',
payload: 'Buy milk'
}
Action Creators
创建 Action, 避免每次实例化 Action 手写重复样板代码。1
2
3
4
5
6const addTodo = text => {
return {
type: 'todos/todoAdded',
payload: text
}
}
Reducers
纯函数,参数是当前的 state 和 action, 输出更新后的 newState, 函数签名(state, action) => newState。
1 | const initialState = { value: 0 } |
Store
Redux 应用的状态存储一个叫做 store 的对象。
store 是通过传递 reducer 给 configureStore 来创建的,并且有一个 getState 的方法返回当前的状态。1
2
3
4
5
6import { configureStore } from '@reduxjs/toolkit'
const store = configureStore({ reducer: counterReducer })
console.log(store.getState())
// {value: 0}
Dispatch
store 有另一个方法 dispatch, 更新 state 的唯一方法就是通过调用 store.dispatch() 函数并且提供一个 action 参数来实现的。store 运行上述我们编写的 reducer ,state 的值更新,然后我们可以通过 getState() 获得更新后的值。1
2
3
4store.dispatch({ type: 'counter/increment' })
console.log(store.getState())
// {value: 1}
Selectors
Selector 是析构 store 里状态的特定信息的函数。随着应用增长,Selector 可以降低解析同样数据的重复代码。1
2
3
4
5const selectCounterValue = state => state.value
const currentValue = selectCounterValue(store.getState())
console.log(currentValue)
// 2
Middleware
Middleware 提供了从 dispatch 一个 action 到被reducer处理之前一种扩展机制,可以用来打印日志,打印错误堆栈,发起异步调用等。
Redux-Thunk
是一种 Middleware,增强 Redux 使其可以 dispatch 一个异步处理函数而非一个简单对象。
代码示例
以官网的 example/async为例。
src 目录结构
1 | src |
index.js
1 | import React from 'react' |
这里主要是做了创建 Store 以及一些和 React 框架绑定的事情(Provider, 可以参考 react-redux )。
这里还涉及到了 middleware 和 thunk,是非常核心的概念,后面会详细解析,但目前不影响理解。
actions/index.js
1 | export const REQUEST_POSTS = 'REQUEST_POSTS' |
这里只要定义了 action, 以及发送请求的部分。
reducers/index.js
1 | import { combineReducers } from 'redux' |
主要是 reducer 纯函数部分。
其他
containers/App.js 和 components/*.js 主要是一些 UI 逻辑,本身并不复杂,这里可自行看官网代码。
2. Redux 原理解读
Redux 数据流向
首先来看一张没有 Middleware 时候的数据流向图,这对后面理解 Middleware 非常有帮助。

图 2.1 Data Flow 示意图
Middleware
首先来完整的介绍一下 Middleware。
Middleware 提供了从 dispatch 一个 action 到被reducer处理之前一种扩展机制,可以用来打印日志,打印错误堆栈,发起异步调用等。
Middleware 主要用来处理异步逻辑(Redux 本身其实并不关心异步逻辑,所有异步操作都需要放到 Store 之外执行)。
- 当 action 被 dispatch 的时候,处理额外的逻辑,比如打日志记录 action 和 state
- 暂定,修改,延时,替换, 停止 action
- 添加额外代码,可以访问 dispatch 和 getState
- 改造 dispatch,使其可以接受除了 action 对象之外的类型,比如函数或者 promise,其原理是拦截这些新的类型,然后转换成真正的 action 对象
Redux 有很多 middleware,最常见的就是 redux-thunk 了,允许你编写含有异步逻辑的函数。
前面章节我们分析了 Redux 的数据流是怎样运转的,当我们引入异步概念后,在 dispatch action 之前我们可以在 middleware 中编写类似发送网络请求的逻辑。更新后的数据流如图 2.2 所示。
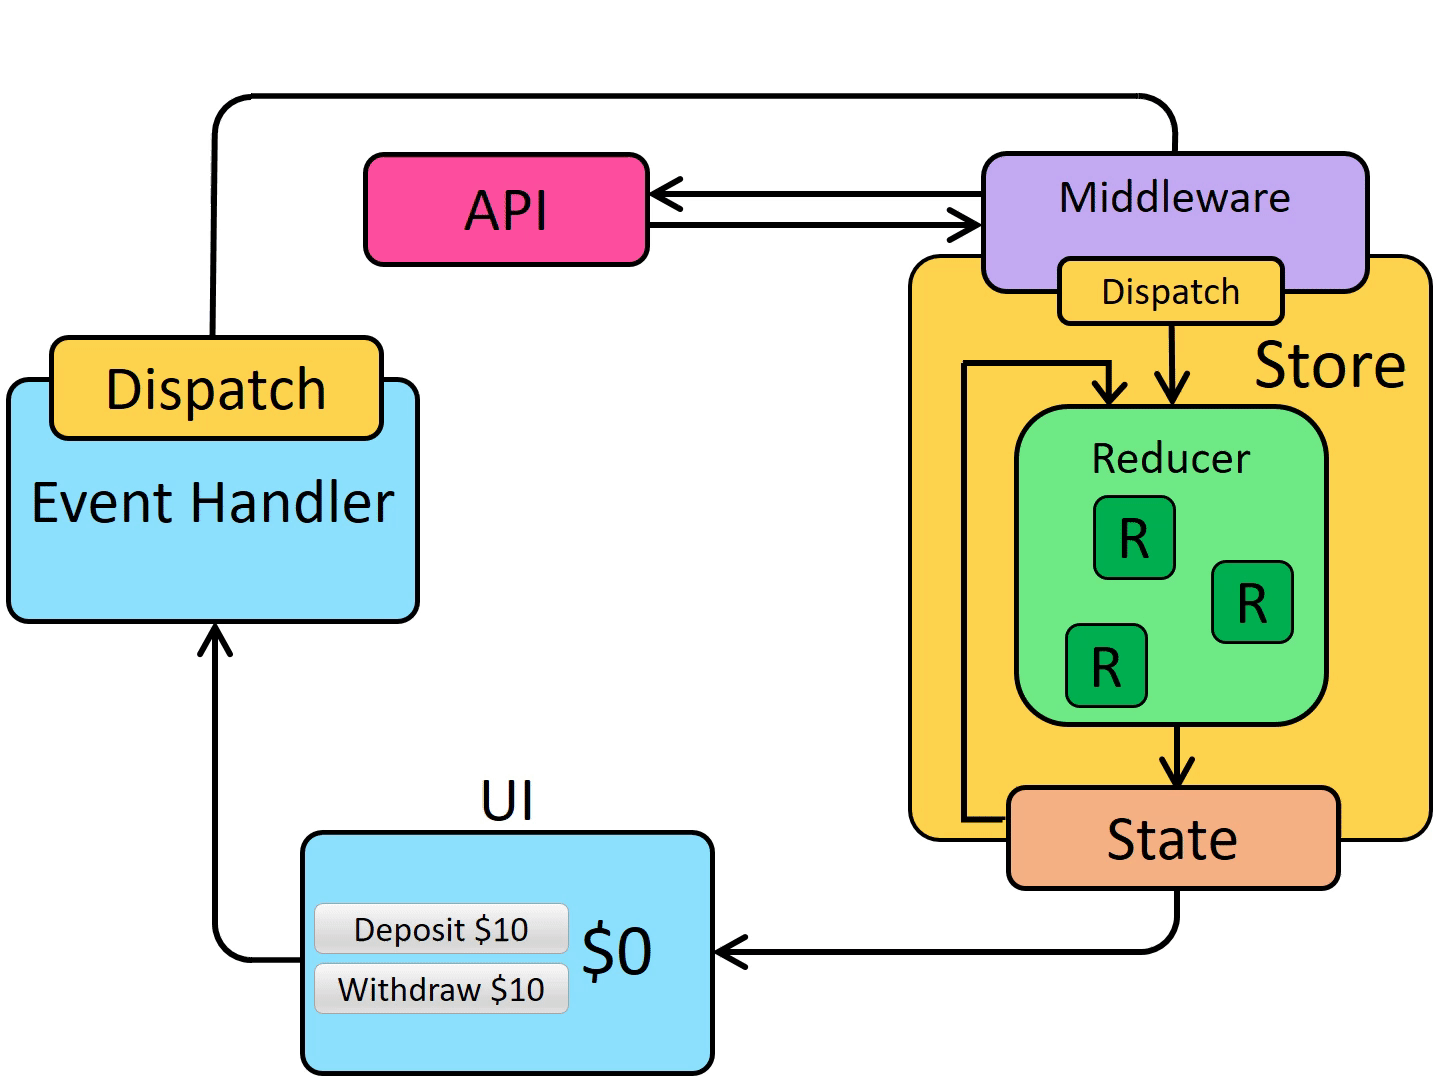
图 2.2 Middleware 示意图
使用 Middleware
1 | import { applyMiddleware, createStore } from 'redux'; |
Redux 提供了 applyMiddleware 方法,该方法支持多个 Middleware 参数传入,例如 applyMiddleware(thunk, promise, logger) , 并且对于参数的顺序敏感,后面会提到为什么,这里只要记住 logger 要放到最后一个才能正常工作。
当 applyMiddleware 调用结束后,会返回 store 的增强版本,然后传递给 createStore 就完成了 Middleware 的应用。
下面将详解这中间发生的过程。
剖析 Middleware
首先我们来看一下 applyMiddleware.js 的源码:1
2
3
4
5
6
7
8
9
10
11
12
13
14
15
16
17
18
19export default function applyMiddleware(...middlewares) {
return (createStore) => (reducer, preloadedState, enhancer) => {
var store = createStore(reducer, preloadedState, enhancer)
var dispatch = store.dispatch
var chain = []
var middlewareAPI = {
getState: store.getState,
dispatch: (action) => dispatch(action)
}
chain = middlewares.map(middleware => middleware(middlewareAPI))
dispatch = compose(...chain)(store.dispatch)
return {
...store,
dispatch
}
}
}
该方法主要作用是用来增强 Store 的 dispatch 方法,也叫做 store enhancer。该方法的入参是 middlware 的列表,返回值就是增强后的 Store 了,而且紧紧替换了 dispatch 方法。
虽然代码不多,但是初看确实不好理解。在真正分析源码之前我们首先要了解函数式编程里的两个概念:柯里化和函数组合。
柯里化(Currying)
柯里化接受多个参数的函数变换成接受一个单一参数(最初函数的第一个参数)的函数,并且返回接受余下的参数而且返回结果的新函数的技术。
说人话,假设有函数 f(x,y) = x + y,未经柯里化之前 f(2,3) = 2 + 3 = 5
对于柯里化我们可以这样处理:1
2
3首先定义 f-2 = (2, y) = 2 + y
因此
f(2,3) = f-2(y)= f-2(3) = 2 + 3 = 5
函数组合(Composing Functions)
函数组合 是通过把一个个简单函数作为参数传递给下一个函数来组合成复杂函数的机制。
假设有:1
2f(x) = x^2 + 3x + 1
g(x) = 2x
那么1
(f * g)(x) = f(g(x)) = f(2x) = 4x^2 + 6x + 1
在 JavaScript 实现函数组合效果是通过 Array.prototype.reduceRight 来实现的。
reduceRight()方法接受一个函数作为累加器(accumulator)和数组的每个值(从右到左)将其减少为单个值。
举例:1
2
3
4
5const array1 = [[0, 1], [2, 3], [4, 5]].reduceRight(
(accumulator, currentValue) => accumulator.concat(currentValue)
);
console.log(array1);
// expected output: Array [4, 5, 2, 3, 0, 1]
我们再来看一下 compose.js 的代码:1
2
3
4
5
6
7
8
9
10
11
12
13export default function compose(...funcs) {
if (funcs.length === 0) {
return arg => arg
}
if (funcs.length === 1) {
return funcs[0]
}
const last = funcs[funcs.length - 1]
const rest = funcs.slice(0, -1)
return (...args) => rest.reduceRight((composed, f) => f(composed), last(...args))
}
composed 就是上一次累计的结果,初始值是 last(...args)。执行顺序从右到左,因此第一次 reduce的累加器 (composed, f) => f(composed) 展开代码:(last(...args), f) => f(last(..args)), 以此类推。
来一个小 demo 验证一下:1
2
3
4
5
6
7
8
9
10
11
12
13var hello = function(x) {
return `Hello, ${ x }`
};
var world = function(x) {
return `${x}!`
};
var compose = function(f, g) {
return function(x) {
return f(g(x));
}
}
var helloworld = compose(hello, world);
helloworld("world")
最终输出结果 "Hello, world!"。
再看 applyMiddleware.js 代码
有了前面的铺垫后,就万事俱备了。1
2
3
4
5
6
7
8
9
10
11
12
13
14
15
16
17
18
19export default function applyMiddleware(...middlewares) {
return (createStore) => (reducer, preloadedState, enhancer) => {
var store = createStore(reducer, preloadedState, enhancer)
var dispatch = store.dispatch
var chain = []
var middlewareAPI = {
getState: store.getState,
dispatch: (action) => dispatch(action)
}
chain = middlewares.map(middleware => middleware(middlewareAPI))
dispatch = compose(...chain)(store.dispatch)
return {
...store,
dispatch
}
}
}
首先 applyMiddleware 返回的是一个匿名函数,在使用 Middleware 一节我们提到 applyMiddleware 是作为 createStore 参数传递下去的。1
2
3
4const store = createStore(
reducer,
applyMiddleware([ myMiddleware1, myMiddleware2, myMiddleware3])
);
我们来看一下 createStore.js 中 createStore 的核心代码:1
2
3
4
5
6
7
8
9
10
11
12
13
14
15
16
17
18
19
20
21
22
23
24
25export default function createStore(reducer, preloadedState, enhancer) {
//部分防护代码删掉
if (typeof enhancer !== 'undefined') {
if (typeof enhancer !== 'function') {
throw new Error('Expected the enhancer to be a function.')
}
return enhancer(createStore)(reducer, preloadedState)
}
//部分防护代码删掉...
//其他关键部分
function getState() {...}
function subscribe(listener) {...}
function dispatch(action) {...}
function replaceReducer(nextReducer) {...}
function observable() {}
}
...
dispatch({ type: ActionTypes.INIT })
return {
   dispatch,
   subscribe,
   getState,
   replaceReducer,
   [$$observable]: observable
 }
applyMiddleware 返回的匿名函数就是 enhancer 这个参数,因此代码会执行到:
return enhancer(createStore)(reducer, preloadedState)
这里 createStore 把自身引用传递到了 applyMiddleware,即匿名函数的第一个参数 createStore,applyMiddleware 代码此时会执行到:1
var store = createStore(reducer, preloadedState, enhancer)
知识点来了哦… 此时调用栈代码又回到了 createStore 方法,但此刻 enhancer 参数为空,因此此时 createStore 不会提前 return, 而是老老实实初始化,最终返回一个 Store 对象:1
2
3
4
5
6
7return {
dispatch,
subscribe,
getState,
replaceReducer,
[$$observable]: observable
}
记住此刻,store 是未经过增强的,执行完毕后,再回到 applyMiddleware 函数。
1 | var chain = [] |
上述几行代码,主要是创建了 middleware 的标准入参(也就是构造 middleware 时候的标准 API),然后遍历 applyMiddleware 传递进来的 middleware 列表,把 {getState, dispatch} 传递给各个 middleware, 最终返回内存中的 middleware 实例。
原本 middleware 的函数声明只这样子的:1
2
3
4
5
6({ dispatch, getState }) => (next) => (action) => {
//执行下一个 Middleware 之前以及 dispatch action 之前执行的操作
let retValue = next(action);
//执行完下一个 Middleware 以及 dispatch action 之后执行的操作
return retValue;
};
经过上述 chain = middlewares.map(middleware => middleware(middlewareAPI)) 操作后(柯里化的参数应用,消灭掉第一个参数 { dispatch, getState }),
内存中的 middleware 转化成如下结构:
1 | (next) => (action) => { |
假设我们有三个 Middleware myMiddleware1, myMiddleware2, myMiddleware3 定义如下:1
2
3
4
5
6
7
8
9
10
11
12
13
14
15
16
17
18
19
20const myMiddleware1 = ({ dispatch, getState }) => (next) => (action) => {
console.log('myMiddleware 1 start');
let retValue = next(action);
console.log('myMiddleware 2 end');
return retValue;
};
const myMiddleware2 = ({ dispatch, getState }) => (next) => (action) => {
console.log('myMiddleware 2 start');
let retValue = next(action);
console.log('myMiddleware 2 end');
return retValue;
};
const myMiddleware3 = ({ dispatch, getState }) => (next) => (action) => {
console.log('myMiddleware 3 start');
let retValue = next(action);
console.log('myMiddleware 3 end');
return retValue;
};
首先经过第一个参数部分求值后:1
2
3
4
5
6
7
8
9
10
11
12
13
14
15
16
17
18
19
20const myMiddleware1 = (next) => (action) => {
console.log('myMiddleware 1 start');
let retValue = next(action);
console.log('myMiddleware 2 end');
return retValue;
};
const myMiddleware2 = (next) => (action) => {
console.log('myMiddleware 2 start');
let retValue = next(action);
console.log('myMiddleware 2 end');
return retValue;
};
const myMiddleware3 = (next) => (action) => {
console.log('myMiddleware 3 start');
let retValue = next(action);
console.log('myMiddleware 3 end');
return retValue;
};
接下来就是函数组合,也是 Redux 中精华的部分了:1
dispatch = compose(...chain)(store.dispatch)
转换后的 dispatch 变成如下结构:1
2
3
4
5
6
7
8
9
10
11
12
13
14
15
16
17
18
19
20
21function dispatch (action) {
var next = (next) => {
var next = (next) => {
return (action) => {
console.log('middleware 3 start');
(store.dispatch)(action)
console.log('middleware 3 end');
};
};
return (action) => {
console.log('middleware 2 start');
next(action)
console.log('middleware 2 end');
};
};
return (action) => {
console.log('middleware 1 start');
next(action)
console.log('middleware 2 end');
};
};
根据展开后的代码可以得出结果,当我们 dispatch 一个 action 的时候,
首先会按照从做到右的顺序执行 Middleware, 直到最后一个 Middleware,而最后一个 Middleware 的 next 参数已经在 compose 的过程中被赋值为 (store.dispatch), 注意此时的 dispatch 是未经过修饰的。因此当 middleware3 执行完毕后,此时 action 才会真正被送到 reducer 进行状态变更。
可以结合图 2.2 来理解。
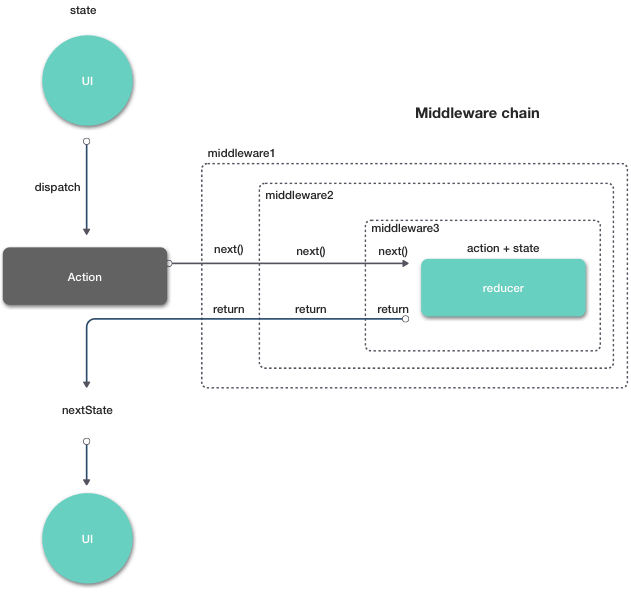
图 2.2 Middleware 运行机制示意
因此控制台输出结果为:1
2
3
4
5
6
7
8//state
middleware 1 start
middleware 2 start
middleware 3 start
//nextState
middleware 3 end
middleware 2 end
middleware 1 end
最后 applyMiddleware 函数返回加强后的整个应用的 store 实例:1
2
3
4return {
...store,
dispatch
}
Middleware 运行机制
剥洋葱图。
为什么 applyMiddleware 对入参顺序敏感
以 redux-logger 为例,必须放到最后一个,否则它只能记录 thunk 或者 promise,而非最终的 action,具体参见。
原理就是如果不放置到最后一个的话,当前的 middlware 并不发送 action,而只是调用 next 传递给下一个 middleware,结合图 2.2,只有 middleware 3 才能记录真正经过 middleware 1 & 2 处理后发送的 action。
Thunk
Thunk中文翻译有转换程序的意思。下面我们看一下 redux-thunk 到底转换了什么。
剖析 Redux-Thunk [^8]
嗯,redux-thunk 代码就这么多。1
2
3
4
5
6
7
8
9
10
11
12
13
14function createThunkMiddleware(extraArgument) {
return ({ dispatch, getState }) => (next) => (action) => {
if (typeof action === 'function') {
return action(dispatch, getState, extraArgument);
}
return next(action);
};
}
const thunk = createThunkMiddleware();
thunk.withExtraArgument = createThunkMiddleware;
export default thunk;
核心逻辑 typeof action === 'function' 判断如果是 function,则调用 function。这使得 action 脱离了简单对象的约束,现在可以返回 function 对象。该 function 接受 getState,dispatch 作为参数,可以用来延时 dispatch action。
例如如下 action creator:1
2
3
4
5
6
7
8
9
10
11
12
13
14
15
16const INCREMENT_COUNTER = 'INCREMENT_COUNTER';
function increment() {
return {
type: INCREMENT_COUNTER,
};
}
function incrementAsync() {
return (dispatch) => {
setTimeout(() => {
// Yay! Can invoke sync or async actions with `dispatch`
dispatch(increment());
}, 1000);
};
}
其他 Middleware
Redux-Logger
去掉各种细节逻辑,处理逻辑也很简单,就是在 returnedValue 前后记录一些信息。1
2
3
4
5
6
7({ getState }) => next => (action) => {
log....
let returnedValue;
returnedValue = next(action);
log....
return returnedValue;
};
细节实现参见redux-logger代码
Redux-Saga
redux-saga 是一个用于管理应用程序 Side Effect(副作用,例如异步获取数据,访问浏览器缓存等)的 library,它的目标是让副作用管理更容易,执行更高效,测试更简单,在处理故障时更容易。
可以想像为,一个 saga 就像是应用程序中一个单独的线程,它独自负责处理副作用。 redux-saga 是一个 redux 中间件,意味着这个线程可以通过正常的 redux action 从主应用程序启动,暂停和取消,它能访问完整的 redux state,也可以 dispatch redux action。
redux-saga 源码稍微有点多,后面考虑单独开坑来写。
Redux-Promise
支持 promise 对象。1
2
3
4
5
6
7
8
9
10
11
12
13
14
15
16export default function promiseMiddleware({ dispatch }) {
return next => action => {
if (!isFSA(action)) {
return isPromise(action) ? action.then(dispatch) : next(action);
}
return isPromise(action.payload)
? action.payload
.then(result => dispatch({ ...action, payload: result }))
.catch(error => {
dispatch({ ...action, payload: error, error: true });
return Promise.reject(error);
})
: next(action);
};
}
更多信息参考redux-promise 代码
2. Think in Redux
动机
当 “变化” 和 “异步” 混在一起,会让我们的应用越来越复杂,就类似曼妥思和可乐混在一起,后果可想而知。
类似于 React 框架分离 View 和对 DOM 的操作,但是应用状态的管理缺撒手不管,这就是 Redux 存在的意义。
随着应用复杂度的提高,我们需要管理越来越多的状态,Redux 让我们重新掌握对状态管理的控制权。
三个原则
单一来源 (Single Source of Truth)
应用的全局状态只存在单一对象 store 中。
仅可读状态 (State is Read-Only)
更改应用状态的唯一方法就是 dispatch 一个 action。
一切变更来自纯函数(Changes are made with pure functions)
根据 action 转换 state 的方法(也就是 reducer) 必须是纯函数。
3. 更多教程
实际应用开发中可能会用到的一些案例。
- Configuring Your Store
- Usage with TypeScript
- Migrating to Redux
- Using Object Spread Operator
- Reducing Boilerplate
- Server Rendering
- Writing Tests
- Computing Derived Data
- Implementing Undo History
- Isolating Redux Sub-Apps
- Using Immutable.JS with Redux
- Code Splitting
- Troubleshooting
- Structuring Reducers
4. 支持平台
本文中默认的都是 JavaScript 版本,由于 Redux 只是一种编程模式,因此可以应用 Android 和 iOS 以及其他 Desktop 的开发技术栈。
JavaScript 版本
https://github.com/reduxjs/redux
Kotlin MultiPlatform
https://github.com/reduxkotlin/redux-kotlin
延伸阅读
- Build Yourself a Redux
Build Yourself 系列,从零开始构建一个 Redux 框架。 - UnderStanding Redux Middleware
- 中间件与异步操作
- Redux 3.6.0 版本代码
- Redux 进阶教程