本文系 Creating JVM language 翻译的第三篇。

0. 自顶向下的方式

开发一门语言不是短期任务,我将以自顶向下的视角来开发。为了避免陷入每个模块的实现细节,我准备先宏观的描述每个模块,然后在每个迭代,我将慢慢加入更多的细节加以完善。

1. 代码

作者原来的代码是 Maven 工程,译者这里改成了 Gradle(译者熟悉 Gradle 并且觉得更为优雅),目录结构以及包名也做了些许改动,但是逻辑上都是等价的。
读者可根据喜好,自行选择。

  • 译者的 Gradle 工程地址
  • 作者的 Maven 工程地址

约定:每个章节,涉及到代码变更,译者都会打 tag, tag 的名字和章节名字保持统一,比如,当前章节的代码版本是 PART-3,以此类推。

2. 功能

本章节我将为 Enkel 添加如下功能特性:

  • 声明 int 或者 string 类型的变量
  • 打印变量
  • 简单的类型推断

示例如下:

1
2
3
4
5
//first.enk
var five=5
print five
var dupa="dupa"
print dupa

下面我们将实现能最简化版本,让上述代码可以运行在 JVM 上。

3. 用 ANTLR4 实现词法分析&语法分析

从零开始实现一个词法分析器是重复性很强的劳动。这里使用 Antlr (Antlr 4)实现。你需要做的只是创建一个语法规则文件,Antlr 帮你生成可以遍历 AST 的基础代码。

本章语法规则文件为 Enkel.g4:

1
2
3
4
5
6
7
8
9
10
11
12
13
14
15
16
17
18
19
20
21
22
//header
grammar Enkel;

@header {
package com.bendcap.enkel.antlr;
}

//RULES
compilationUnit : ( variable | print )* EOF; //root rule - our code consist consist only of variables and prints (see definition below)
variable : VARIABLE ID EQUALS value; //requires VAR token followed by ID token followed by EQUALS TOKEN ...
print : PRINT ID ; //print statement must consist of 'print' keyword and ID
value : op=NUMBER
| op=STRING ; //must be NUMBER or STRING value (defined below)

//TOKENS
VARIABLE : 'var' ; //VARIABLE TOKEN must match exactly 'var'
PRINT : 'print' ;
EQUALS : '=' ; //must be '='
NUMBER : [0-9]+ ; //must consist only of digits
STRING : '"'.*'"' ; //must be anything in qutoes
ID : [a-zA-Z0-9]+ ; //must be any alphanumeric value
WS: [ \t\n\r]+ -> skip ; //special TOKEN for skipping whitespaces

语法规则很简单,需要注意的是:

  • EOF - 文件结束
  • 语法规则中的空格和 ; 是必须

Enkel.g4 定义好后,可以运行命令来生成后续需要的 Java 代码:
antlr Enkel.g4

命令执行完后,会生成四个类:

  • EnkelLexer - 包含 Token 相关信息
  • EnkelParser - 解析器,Token 信息以及一些内部类来做规则解析
  • EnkelListener - 当访问语法节点的时候,提供回调函数
  • EnkelBaseListener - 空的 EnkelListener 实现

译注: 如果你使用 Gradle 工程的话,可以使用 ./gradlew :antlr:generateGrammarSource 来生成上述代码。

其中最重要的是 EnkelBaseListener,这个类提供了遍历 AST 时的回调函数,我们不用关心词法分析和语法分析,Antlr 帮助我们屏蔽了这个过程。

我们可以使用 javac *.java 编译上述代码,来测试我们的规则正确性。

1
2
3
4
5
6
7
$ export CLASSPATH=".:$ANTLR_JAR_LOCATION:$CLASSPATH"
$ java org.antlr.v4.gui.TestRig Enkel compilationUnit -gui
var x=5
print x
var dupa="dupa"
print dupa
ctrl+D //end of file

上述输入会生成如下的图形化树形结构(抽象语法书的图形化展示):

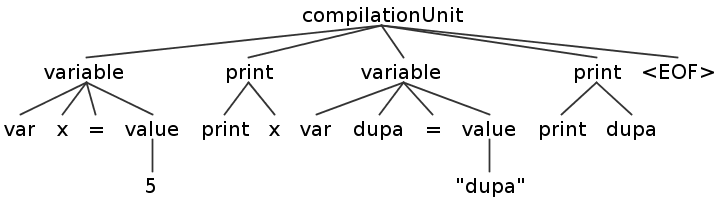
译者注:可以使用 IDEA 插件 ANTLR 4 grammar plugin 来实现同样的效果,或许更方便一些。
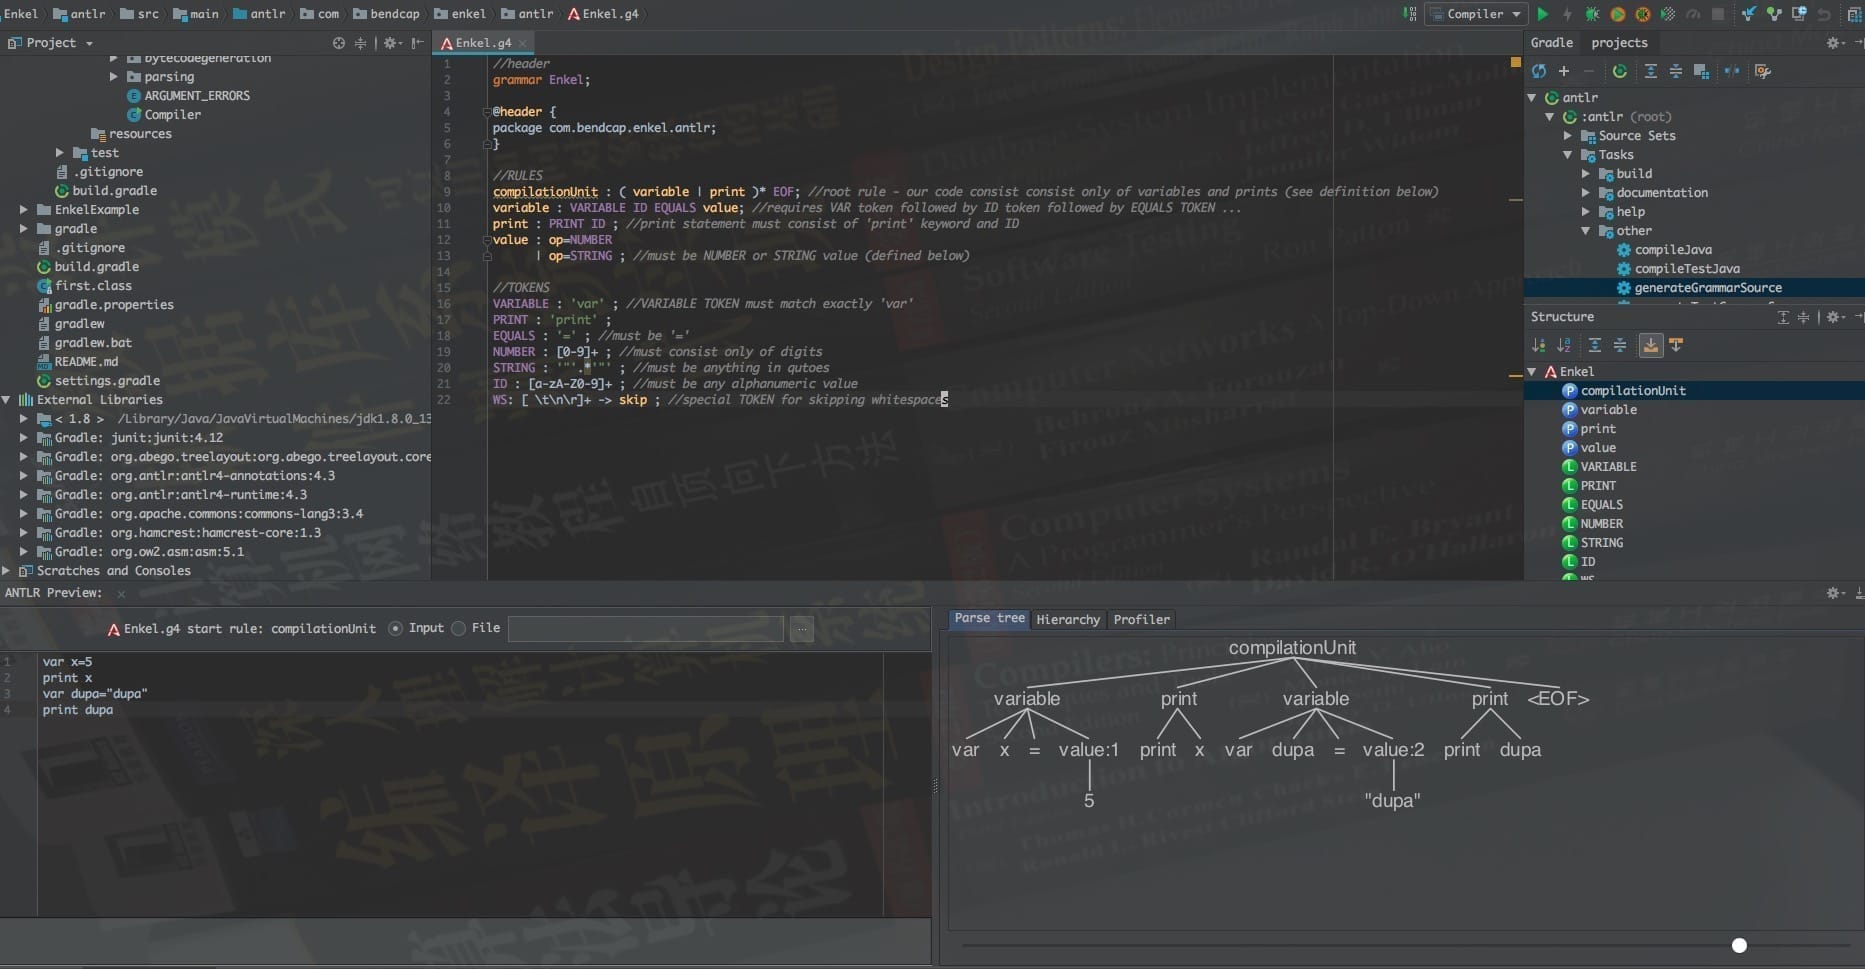
4. 遍历语法树

EnkelListener 提供了我们遍历语法树的办法。

1
2
3
4
5
6
7
8
9
10
11
12
13
14
15
16
17
18
19
20
21
22
23
24
25
26
27
28
29
30
31
32
33
34
35
36
37
38
39
40
41
42
43
44
45
46
47
48
49
EnkelTreeWalkListener.java
public class EnkelTreeWalkListener extends EnkelBaseListener {

Queue<Instruction> instructionsQueue = new ArrayDeque<>();
Map<String, Variable> variables = new HashMap<>();

public Queue<Instruction> getInstructionsQueue() {
return instructionsQueue;
}

@Override
public void exitVariable(@NotNull EnkelParser.VariableContext ctx) {
final TerminalNode varName = ctx.ID();
final EnkelParser.ValueContext varValue = ctx.value();
final int varType = varValue.getStart().getType();
final int varIndex = variables.size();
final String varTextValue = varValue.getText();
Variable var = new Variable(varIndex, varType, varTextValue);
variables.put(varName.getText(), var);
instructionsQueue.add(new VariableDeclaration(var));
logVariableDeclarationStatementFound(varName, varValue);
}

@Override
public void exitPrint(@NotNull EnkelParser.PrintContext ctx) {
final TerminalNode varName = ctx.ID();
final boolean printedVarNotDeclared = !variables.containsKey(varName.getText());
if (printedVarNotDeclared) {
final String erroFormat = "ERROR: WTF? You are trying to print var '%s' which has not been declared!!!.";
System.err.printf(erroFormat, varName.getText());
return;
}
final Variable variable = variables.get(varName.getText());
instructionsQueue.add(new PrintVariable(variable));
logPrintStatementFound(varName, variable);
}

private void logVariableDeclarationStatementFound(TerminalNode varName, EnkelParser.ValueContext varValue) {
final int line = varName.getSymbol().getLine();
final String format = "OK: You declared variable named '%s' with value of '%s' at line '%s'.\n";
System.out.printf(format, varName, varValue.getText(), line);
}

private void logPrintStatementFound(TerminalNode varName, Variable variable) {
final int line = varName.getSymbol().getLine();
final String format = "OK: You instructed to print variable '%s' which has value of '%s' at line '%s'.'\n";
System.out.printf(format, variable.getId(), variable.getValue(), line);
}
}

getInstructionsQueue 按照代码顺序返回指令。

下面我们可以注册 Listener:

1
2
3
4
5
6
7
8
9
10
11
12
13
14
15
16
17
18
19
20
SyntaxTreeTraverser.java
public class SyntaxTreeTraverser {
public Queue<Instruction> getInstructions(String fileAbsolutePath) throws IOException {
CharStream charStream = new ANTLRFileStream(fileAbsolutePath); //fileAbsolutePath - file containing first enk code file

EnkelLexer lexer = new EnkelLexer(charStream); //create lexer (pass enk file to it)

CommonTokenStream tokenStream = new CommonTokenStream(lexer);

EnkelParser parser = new EnkelParser(tokenStream);

EnkelTreeWalkListener listener = new EnkelTreeWalkListener(); //EnkelTreeWalkListener extends EnkelBaseLitener - handles parse tree visiting events
BaseErrorListener errorListener = new EnkelTreeWalkErrorListener(); //EnkelTreeWalkErrorListener - handles parse tree visiting error events

parser.addErrorListener(errorListener);
parser.addParseListener(listener);
parser.compilationUnit(); //compilation unit is root parser rule - start from it!
return listener.getInstructionsQueue();
}
}

这里我提供了另一个 Listener 来做异常处理:

1
2
3
4
5
6
7
8
9
EnkelTreeWalkErrorListener.java
public class EnkelTreeWalkErrorListener extends BaseErrorListener {
@Override
public void syntaxError(Recognizer<?, ?> recognizer, Object offendingSymbol, int line, int charPositionInLine, String msg, RecognitionException e) {
final String errorFormat = "You fucked up at line %d,char %d :(. Details:\n%s";
final String errorMsg = String.format(errorFormat, line, charPositionInLine, msg);
System.err.println(errorMsg);
}
}

遍历语法树的 Listener 写完后,我们来测试一下。创建 Compiler 类作为入口,输入参数为我们 Enkel 语言的源文件路径。

1
2
3
4
5
6
7
8
9
10
11
12
13
14
15
16
17
//Compiler.java
public class Compiler {

public static void main(String[] args) throws Exception {
new Compiler().compile(args);
}

public void compile(String[] args) throws Exception {
//arguments validation skipped (check out full code on github)
final File enkelFile = new File(args[0]);
String fileName = enkelFile.getName();
String fileAbsolutePath = enkelFile.getAbsolutePath();
String className = StringUtils.remove(fileName, ".enk");
final Queue<Instruction> instructionsQueue = new SyntaxTreeTraverser().getInstructions(fileAbsolutePath);
//TODO: generate bytecode based on instructions
}
}

下面我们既可以验证我们的 *.enk 文件了。目前的实现很简陋,但是可以做如下事情:

  • 允许用 var x=1 或者 var x = "anthing" 来声明变量
  • 允许用 print x 打印变量
  • 如果语法不符合规则,报错提示

下面我们创建示例 first.enk:

1
2
3
4
var five=5
print five
var dupa="dupa"
print dupa

验证:

1
2
3
4
5
6
$java Compiler first.enk

OK: You declared variable named 'five' with value of '5' at line '1'.
OK: You instructed to print variable '0' which has value of '5' at line '2'.'
OK: You declared variable named 'dupa' with value of '"dupa"' at line '3'.
OK: You instructed to print variable '1' which has value of '"dupa"' at line '4'.'

first.enk 最后添加一行 void noFunctionsYet(), 再次验证,ErrorListener 可以检测到错误,并且输出如下提示信息:

1
2
You fucked up at line 1,char 0 :(. Details:
mismatched input 'void' expecting {<EOF>, 'var', 'print'}

5. 根据 instructions queue 生成字节码

Java 的 class 文件的包含的指令描述参见 JSE 文档。每一条指令包含如下结构:

  • 操作符(1 byte)- 指令
  • 可选的操作数 - 指令的输入

例: iload 5 (0x15 5),从局部变量加载数据,5 是局部变量数组的索引。
指令也可以实现操作数占的出栈入栈操作。
例如:

1
2
3
iload 3
iload 2
iadd

上述代码分别从局部变量数组中加载索引为 3 和 2 的变量,此时栈中包含两个数值,iadd 指令将栈中两个出栈,相加,然后结果再次入栈。

6. ASM

这里选用 ASM 来操作 Java 字节码。这样可以不用关心非常底层的十六进制数字,你只需要知道指令的名字,ASM 会自动帮你处理剩下的事情。

7. Instruction interface

SyntaxTreeTraverser 在遍历 AST 的时候会把指令按照顺序存储到 instructionsQueue 中。我们做一次抽象,定义接口 Instruction

1
2
3
public interface Instruction {
void apply(MethodVisitor methodVisitor);
}

接口的实现需要使用 MethodVisitor(ASM 提供的类) 来做一些代码生成的操作。

1
2
3
4
5
6
7
8
9
10
11
12
13
14
15
16
17
18
19
20
21
22
23
24
25
26
27
28
29
30
31
32
33
34
35
36
37
//Compiler.java
public void compile(String[] args) throws Exception {
//some lines deleted -> described in previous sections of this post
final Queue<Instruction> instructionsQueue = new SyntaxTreeTraverser().getInstructions(fileAbsolutePath);
final byte[] byteCode = new BytecodeGenerator().generateBytecode(instructionsQueue, className);
saveBytecodeToClassFile(fileName, byteCode);
}
//ByteCodeGenerator.java
public class BytecodeGenerator implements Opcodes {
public byte[] generateBytecode(Queue<Instruction> instructionQueue, String name) throws Exception {

ClassWriter cw = new ClassWriter(0);
MethodVisitor mv;
//version , acess, name, signature, base class, interfaes
cw.visit(52, ACC_PUBLIC + ACC_SUPER, name, null, "java/lang/Object", null);
{
//declare static void main
mv = cw.visitMethod(ACC_PUBLIC + ACC_STATIC, "main", "([Ljava/lang/String;)V", null, null);
final long localVariablesCount = instructionQueue.stream()
.filter(instruction -> instruction instanceof VariableDeclaration)
.count();
final int maxStack = 100; //TODO - do that properly

//apply instructions generated from traversing parse tree!
for (Instruction instruction : instructionQueue) {
instruction.apply(mv);
}
mv.visitInsn(RETURN); //add return instruction

mv.visitMaxs(maxStack, (int) localVariablesCount); //set max stack and max local variables
mv.visitEnd();
}
cw.visitEnd();

return cw.toByteArray();
}
}

由于目前 Enkel 不支持 方法,类以及作用域等概念,因为编译后的类直接继承自 Object, 包含一个 main 函数。MethodVisitor 需要提供局部变量以及栈的深度。然后我们遍历 instructionQueue 的每条指令来生成对应的字节码。目前我们只有两种指令(变量声明以及打印语句):

1
2
3
4
5
6
7
8
9
10
11
12
13
14
15
16
17
18
19
20
21
//VariableDeclaration.java
public class VariableDeclaration implements Instruction,Opcodes {
Variable variable;

public VariableDeclaration(Variable variable) {
this.variable = variable;
}

@Override
public void apply(MethodVisitor mv) {
final int type = variable.getType();
if(type == EnkelLexer.NUMBER) {
int val = Integer.valueOf(variable.getValue());
mv.visitIntInsn(BIPUSH,val);
mv.visitVarInsn(ISTORE,variable.getId());
} else if(type == EnkelLexer.STRING) {
mv.visitLdcInsn(variable.getValue());
mv.visitVarInsn(ASTORE,variable.getId());
}
}
}

这里值得注意的是,我们已经添加了简单的类型推断。我们会根据变量的实际类型进行类型推断。针对不同类型我们需要调用 ASM 不同的方法:

  • visitInsn - 第一个参数是操作符,第二个是操作数
  • BIPUSH - 把一个 byte(integer) 入栈
  • ISTORE - int 类型的值出栈,并存储到局部变量中,需要指定局部变量的索引
  • ASTORE - 和 ISTORE 功能类似,但是数据类型是索引

打印语句的代码生成如下:

1
2
3
4
5
6
7
8
9
10
11
12
13
14
15
16
17
18
19
20
//PrintVariable.java
public class PrintVariable implements Instruction, Opcodes {
public PrintVariable(Variable variable) {
this.variable = variable;
}

@Override
public void apply(MethodVisitor mv) {
final int type = variable.getType();
final int id = variable.getId();
mv.visitFieldInsn(GETSTATIC, "java/lang/System", "out", "Ljava/io/PrintStream;");
if (type == EnkelLexer.NUMBER) {
mv.visitVarInsn(ILOAD, id);
mv.visitMethodInsn(INVOKEVIRTUAL, "java/io/PrintStream", "println", "(I)V", false);
} else if (type == EnkelLexer.STRING) {
mv.visitVarInsn(ALOAD, id);
mv.visitMethodInsn(INVOKEVIRTUAL, "java/io/PrintStream", "println", "(Ljava/lang/String;)V", false);
}
}
}
  • GETSTATIC - 从java.lang.System.out获得静态属性,类型是 java.io.PrintStream
  • ILOAD - 把局部变量入栈,id 是局部变量的索引
  • visitMethodInsn - 访问方法指令
  • INVOKEVIRTUAL - 触发实例方法 (调用 out 的 print 方法,该方法接受一个参数为整数类型,返回为空)
  • ALOAD - 和 ILOAD 类型,但是数据类型是引用

8. 生成字节码

cw.toByteArray(); 执行后,ASM 创建一个 ByteVector 实例并把所有的指令加入进去。Java class 文件的结构为:

1
2
3
4
5
6
7
8
9
10
11
12
13
14
15
16
17
18
19
//https://docs.oracle.com/javase/specs/jvms/se8/html/jvms-4.html#jvms-4.1
ClassFile {
u4 magic; //CAFEBABE
u2 minor_version;
u2 major_version;
u2 constant_pool_count;
cp_info constant_pool[constant_pool_count-1]; //string constants etc...
u2 access_flags;
u2 this_class;
u2 super_class;
u2 interfaces_count;
u2 interfaces[interfaces_count];
u2 fields_count;
field_info fields[fields_count];
u2 methods_count;
method_info methods[methods_count];
u2 attributes_count;
attribute_info attributes[attributes_count];
}

魔数(Magic Number)是 0xCAFEBABE。由于 Enkel 目前不支持字段,属性,父类或者接口,因此我们这里主要描述了 method_info

9. 写入字节码到文件

JVM 规范要求我们 .class 文件的名字必须和类型相同。所以我们这里保持文件名字和类名一直,仅替换后缀 (enk -> .class)。

1
2
3
4
5
6
7
//Compiler.java
private static void saveBytecodeToClassFile(String fileName, byte[] byteCode) throws IOException {
final String classFile = StringUtils.replace(fileName, ".enk", ".class");
OutputStream os = new FileOutputStream(classFile);
os.write(byteCode);
os.close();
}

10. 验证字节码

我们可以使用 JDK 自带的 javap 工具来验证生成的字节码的正确性。

1
2
3
4
5
6
7
8
9
10
11
12
13
14
15
16
17
18
19
20
21
22
23
24
25
26
27
28
29
30
31
32
33
34
35
36
37
38
39
40
41
42
43
44
45
46
47
48
49
50
51
52
53
54
$ $JAVA_HOME/bin/javap -v file

Classfile /home/kuba/repos/Enkel-JVM-language/file.class
Last modified 2016-03-16; size 335 bytes
MD5 checksum bcbdaa7e7389167342e0c04b52951bc9
public class file
minor version: 0
major version: 52
flags: ACC_PUBLIC, ACC_SUPER
Constant pool:
#1 = Utf8 file
#2 = Class #1 // file
#3 = Utf8 java/lang/Object
#4 = Class #3 // java/lang/Object
#5 = Utf8 Test.java
#6 = Utf8 main
#7 = Utf8 ([Ljava/lang/String;)V
#8 = Utf8 java/lang/System
#9 = Class #8 // java/lang/System
#10 = Utf8 out
#11 = Utf8 Ljava/io/PrintStream;
#12 = NameAndType #10:#11 // out:Ljava/io/PrintStream;
#13 = Fieldref #9.#12 // java/lang/System.out:Ljava/io/PrintStream;
#14 = Utf8 java/io/PrintStream
#15 = Class #14 // java/io/PrintStream
#16 = Utf8 println
#17 = Utf8 (I)V
#18 = NameAndType #16:#17 // println:(I)V
#19 = Methodref #15.#18 // java/io/PrintStream.println:(I)V
#20 = Utf8 \"dupa\"
#21 = String #20 // \"dupa\"
#22 = Utf8 (Ljava/lang/String;)V
#23 = NameAndType #16:#22 // println:(Ljava/lang/String;)V
#24 = Methodref #15.#23 // java/io/PrintStream.println:(Ljava/lang/String;)V
#25 = Utf8 Code
#26 = Utf8 SourceFile
{
public static void main(java.lang.String[]);
descriptor: ([Ljava/lang/String;)V
flags: ACC_PUBLIC, ACC_STATIC
Code:
stack=2, locals=3, args_size=1
0: bipush 5
2: istore_0
3: getstatic #13 // Field java/lang/System.out:Ljava/io/PrintStream;
6: iload_0
7: invokevirtual #19 // Method java/io/PrintStream.println:(I)V
10: ldc #21 // String \"dupa\"
12: astore_1
13: getstatic #13 // Field java/lang/System.out:Ljava/io/PrintStream;
16: aload_1
17: invokevirtual #24 // Method java/io/PrintStream.println:(Ljava/lang/String;)V
20: return
}

11. 运行 Enkel

下面我们来运行第一个 Enkel 代码:

1
2
3
4
var five=5
print five
var dupa="dupa"
print dupa

如果一切顺利的话,会有如下输出:

1
2
3
4
$java Compiler first.enk
$java first
5
"dupa"

译者注:上述成品代码托管在 Github

预告:下一节给 Enkel 增加一大坨特性,并定义好规范,方便后续迭代实现。